Ladybird Tuesday - Talkabout holidays

With the summer holidays upon us and many people off, or about to set off, on their family hols this book seemed a good choice for this week’s Ladybird Tuesday post.   Talkabout holidays was  published in 1977, compiled by Margaret West, illustrated by Robert Ayton and Martin Aitchison, with cover design by Harry Wingfield. 


“Most children become excited at the mention of holidays and this interest can be encouraged and developed to increase vocabulary.  Planning a holiday involves choosing; a place to go, a type of holiday whether you go by road, or rail, or air.  Packing brings in the question of volume and weight: how much will go into a suitcase, how much will it weigh, can you carry it?”


This Ladybird book is from the ‘Talkabout’ series, to be read - and enjoyed - with pre-school aged children.  Talkabout holidays was produced by Ladybird with the aid of qualified nursery school advisers, to encourage comment and discussion, with young children.  The Talkabout series covers a range of topics that young children would be familiar with and is intended to help parents develop their children’s appreciation of books and ready them for learning to read once they start school.  I’ve already covered Talkabout home and Talkabout starting school in previous Ladybird Tuesday posts.


Each page heading and picture is the starting point for conversation about an aspect of holidaying.
Illustrations are realistic and representative of familiar situations to enable young children to identify objects, creatures and situations.  This recognition and interest is used to encourage their verbal development with simple counting, identification of objects, shapes and descriptive vocabulary, positional language and many other skills useful in developing effective communication and learning to read.


There are also these comic strip pages that allow children to look at the pictures and tell the story themselves.  Not only is this a fun and creative activity, but learning that pictures in sequence can tell a story is a useful strategy to employ as they learn to read.


Ladybird provides parents with notes at the back of the book to enable them to make the fullest use of this book.  


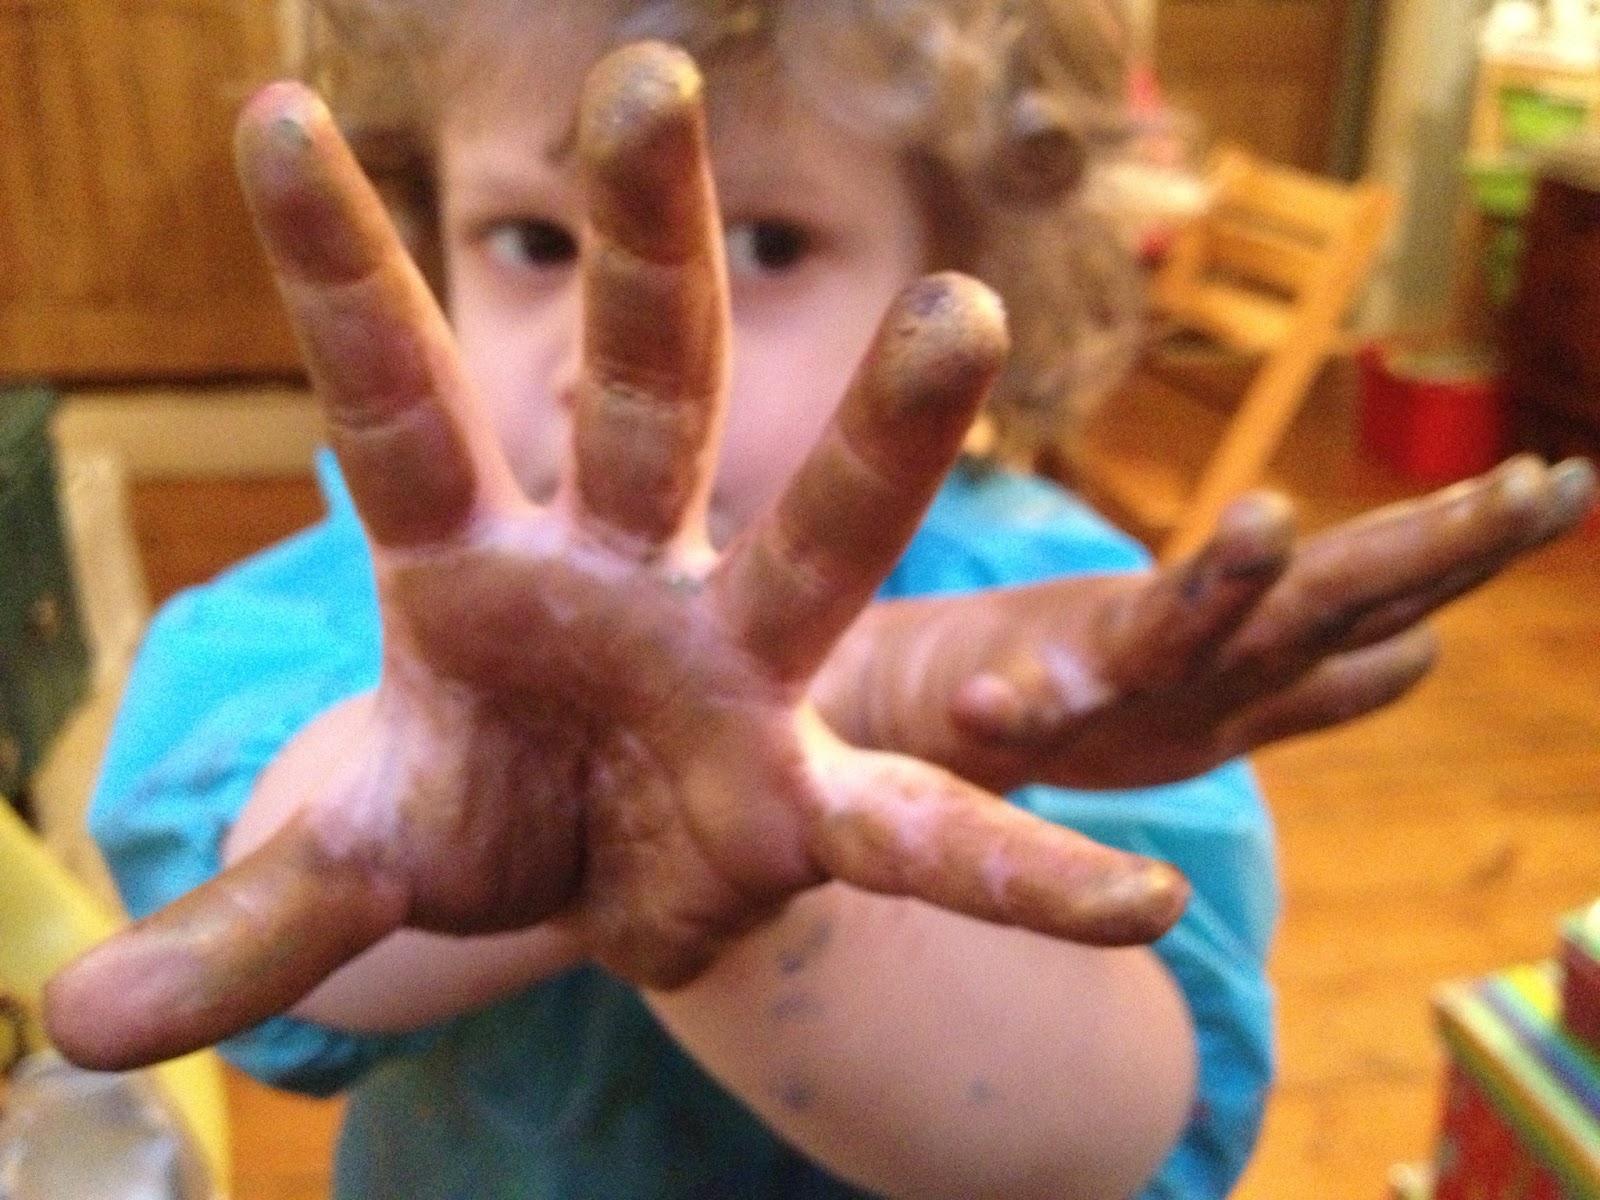
So, we're having a lovely time, how are your summer hols going?  We’ve been bike riding and  scootering, dog walking and garden visiting, painting, sewing, crafting and making to our little hearts content.  And with the British weather doing it’s best for us at the moment (Well, today's dog walk was in the rain, but...) we are having a wonderful time.


I love the summer holidays when there is no need to jump up and get the children off to school.  The little foxes sometimes argue a bit more than usual, as they are spending more time with each other, but, I feel that I am nagging and shouting less, with nothing that we have to get to in a hurry.  

Hurray for the holidays!  If only they could last forever...


This post is part of the Ladybird Tuesday linky started on the Being Mrs C blog, take a look at her posts here.

The rest of Mrs Fox's Ladybird Tuesday posts are here and if you have a collection of Ladybird books, please do feel free to join in.

0

Belle & Boo - And The Yummy Scrummy Day


Belle & Boo is a brand that I love, loved it since I first picked up a Boo badge that my daughter wore on her coat all year.  We have a couple of Mandy Sutcliffe's other books, prints for each of the little foxes and the Belle and Boo range is getting bigger all the time.  I love the look of her latest crafting book, I'm going to buy it and see what we can make during the summer holidays - that's for another post methinks.


In the meantime we have a copy of her beautiful book, Belle & Boo - And The Yummy Scrummy Day  to give away.  It is such a pretty little book and the reason I love it, is that it is about all the fun young children can have with food.  Belle and her best friend, the rabbit Boo, play, make and bake a healthy feast.

My little foxes love their food and are, I hope, developing a great attitude towards food, it's pleasures and what's good for them to eat.  I think it really important to teach my children where their food comes from, and introduce them to the wonderful tastes of unadulterated fresh fruit and veggies.  We have a garden full of edible plants and an allotment, and we love to go foraging on our dog walks; blackberries, apples, plums, elderberries and their flowers and sloes to mention just those that immediately spring to mind.  

They both love to cook with me.  Cooking, gardening and foraging are healthy, creative and cost effective ways to pass the time over the summer hols.  For me, good food and making things, the creativity of our own hands, are my passions and something I can share with my children daily.   I sometimes think I'm just a little old fashioned.


And I love the nostalgic aura of Mandy Sutcliffe's beautiful illustrations, they make me think of a childhood of warm summer afternoons.  We have a few of the Belle and Boo paper dress up dolls in Mrs Fox's store.


My daughter loves hers, plays with it loads, we've downloaded extra clothes from the Belle and Boo website and she has made up her own designs too.  It just shows how simple, old fashioned toys can turn on a child's creativity.


If your little one's birthday is soon Belle and Boo party-ware is in Mrs Fox's store, a Belle & Boo Party Box for 8 is only £35, it includes invitations and thank you cards, tableware, a pin the tale on the donkey game and cake topper.

So, one lucky person will win copy of this beautiful hardback book, Belle & Boo - And The Yummy Scrummy Day, simply comment on this post, we'll draw the winner on Monday 5th August, Little Louis Fox will pull one name out of a hat, (call me old skool but I prefer that to one of those random number generator thingys) and if you like what you see here and want to go visit our Facebook page, or watch my pinterest addiction, or join our mailing list, or check out our shop, please feel free...  it's all great stuff, honest xxx
8

To the moon and stars... and back downstairs again...


Any familiar readers will know that we've touched on rockets before when discussing how kids often think they're not good at arts and craft, yet when they get down to it, can create works that they're deeply proud of.

Our Crafty Box subscribers will also know that we have had a little focus on ‘things that fly’… our 3rd Crafty Box was centred around animals that fly and we included crafts for making different types of birds, flying fish and and a bird house.
Our latest Crafty Box is about man made ‘things that fly’ and we found ourselves looking at rockets again.  We've both made plastic bottle rockets with our kids before so we wanted to try a different version and came up with a kitchen roll rocket.  You can also make these rockets with toilet rolls but we've been told that schools and nurseries may not be able to use toilet rolls for crafts due to health and safety… should you feel comfortable with toilet rolls, go ahead.  Our little foxes make lots of things with toilet rolls so we keep lots in a box!

For the kitchen roll rocket you will need;
  • A kitchen roll
  • Foil
  • Glue and sticky tape
  • Scraps of paper
  • Paint
  • Light card or heavy paper
  • Scissors
  • Our template for rocket fins
  • Tissue paper or bright coloured ribbons or raffia string
Paint your kitchen roll.
While it dries, (check pic below) draw a circle with a roughly 5cm radius and inside this, a circle with a 3.5cm radius.
Cut out your circle and make snips from the outside to the 3.5cm line and one final snip to the centre of the circle.
Fold the circle into a cone and glue or tape together.
Take a 17ish cm strip of foil an fold both long edges in to give your strip a nice tidy shape.
Copy our template below, cut out 3 rocket fins from your heavy paper.


Fold them down the middle and glue the larger parts together leaving the outer strips glue free.

Now that the painted roll is dry, put your cone on the top of your kitchen roll and bring the frilled edge down so that it attaches to the roll and hold in place with sticky tape.

Cover your cone in foil and then wrap around your straight edged foil strip where the foil from the cone overlaps the kitchen roll.

Your fins will need to be attached approx. 5cm apart around the tube and you can either glue them to the outside then paint in the same colour as your rocket, or, cut 6cm snips upwards from the base, 5cm apart around the base and slide the fins into place. 

Cover the protruding parts of the fins with tin foil. 

Paint or draw on your windows and rocket name/initials.  Alternatively, make these from scraps of paper and stick them on.

Stuff the tissue paper inside the rocket so that it spills out like flames


For the plastic bottle rocket... 


...you will need;
  • A plastic bottle
  • Foil
  • Scissors
  • An egg carton
  • Tissue paper or coloured strips of paper
  • Scraps of paper
  • Sticky tape
  1. Cover your bottle in foil
  2. Cut out 3 or 4 cups from the egg carton and cover in foil
  3. Make a door and windows and cut out initials for your rocket’s name and decorate your rocket
  4. Using sticky tape, attach your foiled egg carton cups to the bottom of the rocket
  5. Again, use tape to stick your tissue paper ‘flames’ into the egg cups

The bottle rocket is certainly one which younger hands will find more fun, they get to squish and press the foil, it's a very tactile craft.  My young fox had been certain that he could never make anything look as he thought it should look but at 4 years old, this rocket changed everything.  He was proud as punch with this one and we stuck it to the bedroom wall under his giant foil moon and stars.  Every now and then, he would thunder up the stairs and come running back down with shiny rocket to show it off to any friends and family who had not yet witnessed his NASA craft.


0

Mrs Fox's Crafty Boxes - Flying Things Part Two


Detailed instructions and print outs to craft planes, catapults, 3D kite and hot air balloon pictures, flying saucers, helicopters, rockets and paper planes. £12 (+£4.50 p&p)

If you like this craft box you can purchase a subscription for £10.50/ month +p&p


0

Crafting with Boys


Today the other Mrs Fox and I have been slaving in the studio, in the hot summer sun, getting our next Crafty Box ready to head out the door to all our little crafty foxes.  Last month's theme was flying and we came up with so many ideas that we decided to split the box over two months.  So, last month was Flying Animals this month is Flying Machines.  Purely by accident this month's craft box is very boy friendly.


I can't be the only mother who has noticed the difference between girls and boys when it comes to making things.  Little Una Fox will sit and draw, paint, cut, stick, sew, knit, model, string beads, collage with flowers... the list is never ending.  And when she is a little bored she usually asks me, "Mummy, what can I make?"  And I know that Little Eve Fox is the same.  


My son, on the other hand, who is not a particularly 'boy-ish' boy, loves to get messy when he crafts. That is basically his criteria for a good time.  But that good time seldom lasts all that long.  He get's bored quite quickly.


Last weekend in the midst of the heat we pulled the garden table out of it's position under the pergola and set up an outdoor studio for the little foxes.  With tables and chairs, cushions and carpet, their crafting box with paints, scissors, glue etc and their easel.  We put them in old swimming costumes which were quickly shed, so that they could make as much mess as they liked.  They spent the whole day in the garden occasionally jumping into their paddling pool.  It was the most focused I have seen Louis when painting.  He was extremely proud of one particular picture and insisted on taking it into school on Monday to show his teacher.


I think that being outside and allowed to really make a mess gave him a real sense of freedom.  From little Louis Fox there was a lot of chat about cars, and garages with wheels and boats that could take cars on board, he really let his imagination run riot.  He painted picture after picture, sketching some of his ideas in pencil first, enjoying mixing the colours, and layering the paint on thick and fast.

It was great to see him really enjoying himself and crafting with zest.  He's asked to paint every day this week.  So, I am pretty chuffed with this month's box, lots to get him interested in crafting.  For from this month's crafty box we will be making; planes, catapults, 3D kite and hot air balloon pictures, flying saucers, helicopters, rockets and paper planes.  


Loads to do for the summer holidays!  It will be going out to our subscribers imminently.  If you would like to purchase one for a little help crafting with your boys this summer hols they are £12 (+£4.50 p&p), to pre-order  click here.


2

The Princess And The Pea


One of Little Una Fox's favourite fairy tales is The Princess And The Pea and her favourite version is the one by Lauren Child and Polly Borland.


"'What a beautiful bed', gasped the girl.  'Oh, I am sure I will sleep like a real princess in this bed.'  And up the ladder she climbed. We'll see, thought the queen"


Lauren Child's text is, of course, great but it is her and Polly Borland's illustrations that I really admire.  They remind me of my favourite Fairytale book from my own childhood, which my mother unfortunately did not keep.

Each page was illustrated with posed dolls in 3 dimensional sets.  This is an idea that I keep thinking I would like to try my hand at.  If I ever get around to making the dolls, the sets and taking the pictures it will be a miracle but I am not ruling it out altogether.


Because this is our favourite it was natural, when Mrs Fox's was asked by a friend for a princess themed party for their daughter's 4th birthday, to turn to this tale.  Mrs Fox's created a Hunt the Pea party game, (we made felt peas and pea pods), place mats with the missive; "Give peas a chance" and one of my favourite Mrs Fox's crafts, our Make your Own Sleeping Princess.  This is a craft activity for the party that doubles as a party bag for the little guests to take home, along with a packet of sweet pea seeds.


For the make-your-own sleeping princess craft I attached a patchwork pocket to the front of a natural cotton bag.  Our princess was a blank rag doll each made up with a different hairstyle.  The patchwork pocket on each bag is for the dolls to 'sleep' in.  At the party the children designed their own sleeping princess, with fabric pens.  It was a huge success, and you can see what an impressive party bag it was too.


I made Una her own sleeping princess doll for Christmas that year, you can see her at the top of this post.  I make each of the little foxes at least one Christmas gift each year.

This weekend I was working on updating the, very simple, instructions for this craft as we intend to sell it on our website as one of our crafty boxes.  We even have long-term plans to make two versions, one for children that can sew and could make the patchwork pocket themselves.


While I worked and as we chatted about my old fairytale book and the pictures I remembered from it.  And the usefulness of shoe boxes when creating a four poster bed.  Una began fashioning various items for her own sleeping princess pictured above.  Who seems to have a rather severe case of jaundice!

I just couldn't keep out of it.  I was soon, secateurs in hand, fashioning a ladder and we were picking fabrics to make bedding.  I admit this is a rather niche craft, but, this is how we made the Princess Bed for our sleeping princess.  Just in case you ever have need of such an item!

YOU WILL NEED:


First we decorated the shoe box and it's lid with patterned paper and paint.  While it dried...

We measured the bottom of the box and cut out two rectangles of each of our fabrics to these dimensions.  We used other scraps of fabric as the wadding for our mattresses.  With the wadding between each piece of fabric we sewed round the edges.

The lid of the box is the bed's headboard and to this we attached some netting (off cuts of old net curtains from granny's house) I sewed these onto the lid, you could glue or staple them.

To make the ladder I cut up a thin bamboo cane and tied the steps on with garden twine.

The pea is a green felted ball.  You could just use green felt rolled into a ball or paper scrunched up and painted green.


Our Sleeping Princess Crafty Box is available on our website for a very special price at the moment only £6 +p&p (£4.50). Each Sleeping Princess is unique, with their hairstyles and the patchwork pocket on the bag hand-sewn and so each different from the next.


4
Back to Top